> ## Documentation Index
> Fetch the complete documentation index at: https://docs.ocular.dev/llms.txt
> Use this file to discover all available pages before exploring further.
# Unicommerce
> Connect Unicommerce (Uniware) to Ocular with username, password, account code, and selected facility codes to sync OMS orders, inventory, and fulfilment.
**Required fields in Ocular:**
* **Unicommerce Username** – any active Uniware user with API access
* **Unicommerce Password** – the password you set for that user
* **Unicommerce Account Code** – the tenant part of your Uniware URL (e.g., `demo` in `https://demo.unicommerce.com`)
Follow the three sections below: grab each credential in Uniware, then paste them into **Data Management → Connectors → Add connector → Unicommerce**.
Username, password, account code, and the facility codes you want to sync.
SKU master across channels, inventory-aware reporting, returns and status reconciliation in the Fulfilment data model.
***
## Step 1 · Find your Account Code
Log in to Uniware in your browser.
The address bar reads `https://ACCOUNT_CODE.unicommerce.com/...`.
Everything before `.unicommerce.com` is your Account Code. Copy that string exactly — it is **case-sensitive**.
***
## Step 2 · Create (or pick) an API-capable user
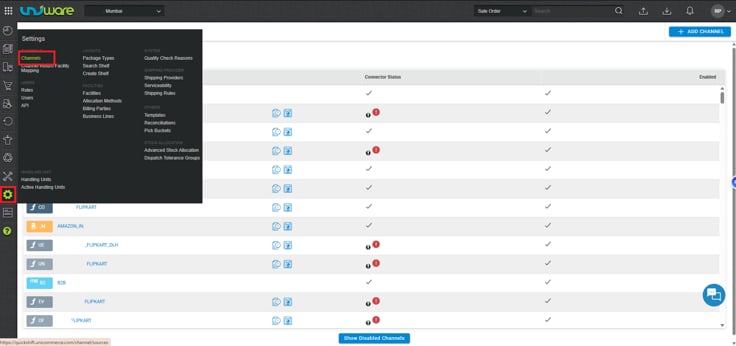
Go to **Settings (gear icon) → Users**.
Click **Add** to create a dedicated user or select an existing one. Learn more in [Unicommerce Documentation](https://unicommerce.com).
Fill a unique Username (e.g., `ocular_api`). Set a strong password and give the user **Admin role** or explicit access to the facilities whose data you will pull. Click **Save**.
You can reset the password anytime from the same Users page. Some older guides mention *API User* under *Integration* — newer Uniware accounts use the standard user list, and both work as long as the user has the required permissions.
***
## Step 3 · Plug the credentials into Ocular
In Ocular, open **Data Management → Connectors → Add connector → Unicommerce**.
The username you created or selected.
The password you just set.
The string from Step 1 (case-sensitive).
YYYY-MM-DD — choose the date from which you want Ocular to begin pulling your Unicommerce data.
The number of days for which Ocular will keep refreshing past data (default is 30 days). This is particularly important for returns, as order returns can be triggered on any sales order up to several days after placing the order. For example, with a 30-day lookback, Ocular will daily check if any orders placed in the last 30 days have resulted in returns or other status changes.
These represent the specific warehouses or fulfillment centers within your Unicommerce account. Click the **Fetch Facilities** button to retrieve all available facilities, then select one or multiple codes. If you don't select any specific facilities, data from all facilities will be pulled by default.
The username you created or selected.
The password you just set.
The string from Step 1 (case-sensitive).
YYYY-MM-DD — choose the date from which you want Ocular to begin pulling your Unicommerce data.
The number of days for which Ocular will keep refreshing past data (default is 30 days). This is particularly important for returns, as order returns can be triggered on any sales order up to several days after placing the order. For example, with a 30-day lookback, Ocular will daily check if any orders placed in the last 30 days have resulted in returns or other status changes.
These represent the specific warehouses or fulfillment centers within your Unicommerce account. Click the **Fetch Facilities** button to retrieve all available facilities, then select one or multiple codes. If you don't select any specific facilities, data from all facilities will be pulled by default.
Optionally restrict the sync to specific sales channels. Type a channel name and press **Enter** to add it (**Backspace** removes the last one). Find your channel names in Uniware under **Settings → Channels**.
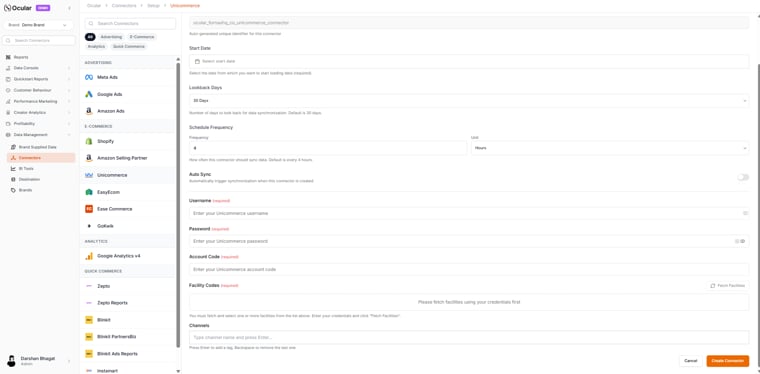 Click **Create Connector**. Ocular sends a Basic-Auth request to Uniware's `/services/rest/v1/auth` endpoint; on success, you'll see **Connection successful**.
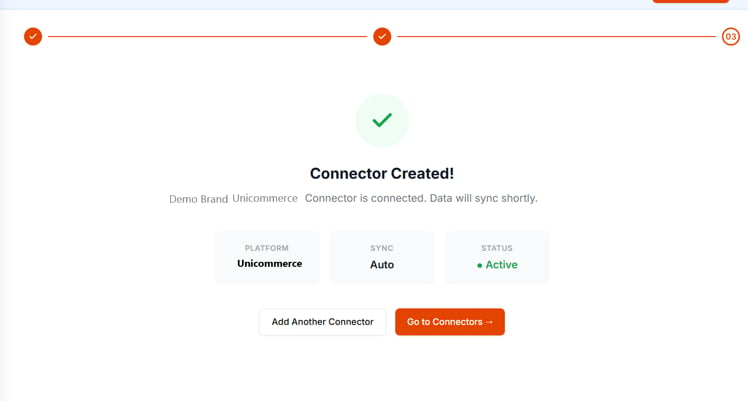
Click **Create**. The credentials are encrypted in Ocular's vault; your first incremental sync kicks off within minutes.
Click **Create**. The credentials are encrypted in Ocular's vault; your first incremental sync kicks off within minutes.
Click **Create Connector**. Ocular sends a Basic-Auth request to Uniware's `/services/rest/v1/auth` endpoint; on success, you'll see **Connection successful**.
Click **Create**. The credentials are encrypted in Ocular's vault; your first incremental sync kicks off within minutes.
Click **Create**. The credentials are encrypted in Ocular's vault; your first incremental sync kicks off within minutes.
 ***
## Troubleshooting
Re-check the account code (case-sensitive) and confirm the user is still active with a non-expired password. Reset the password in Uniware and retry.
The selected user must have explicit access to every facility you want to sync, or be an Admin. Open the user in Uniware and verify the facility list, then re-run **Fetch Facilities** in Ocular.
Increase **Lookback Days** above 30 — returns can be triggered several days after the original order. A 60- or 90-day lookback is common for brands with long return windows.
For ticket-writing format when filing a connector issue, see [Working with the Ocular team → Connector-not-working tickets](/overview/working-with-the-ocular-team).
***
## Troubleshooting
Re-check the account code (case-sensitive) and confirm the user is still active with a non-expired password. Reset the password in Uniware and retry.
The selected user must have explicit access to every facility you want to sync, or be an Admin. Open the user in Uniware and verify the facility list, then re-run **Fetch Facilities** in Ocular.
Increase **Lookback Days** above 30 — returns can be triggered several days after the original order. A 60- or 90-day lookback is common for brands with long return windows.
For ticket-writing format when filing a connector issue, see [Working with the Ocular team → Connector-not-working tickets](/overview/working-with-the-ocular-team).